Setting up an Account with Paya
• If you are an existing Sage 100 Cloud customer, please contact your Sage Business Partner to add Merchant services to your solution.
• If you do not have an existing relationship with a Sage Business Partner, please contact Paya's Sales directly at 1-800-261-0240, option 2.
Information about Paya Connect
• Paya provides a knowledgebase for our Paya Connect Customer Portal; these articles can be found here.
• Paya’s Customer Enablement Team will assign a User ID and an API Key, which will be entered into Sage 100 Cloud to establish the connection between the two products.
Customizable Notification Templates for Paya Connect Quick Invoicing
Paya Connect has default templates for Quick Invoicing email notifications; these templates can be customized upon request. Please contact the Customer Enablement Team to receive a copy of the default templates added to your account for customization. The template options for quick invoicing are as follows:
• Quick Invoice Notification (this is the primary template used when the initial Quick Invoice is sent out).
• Quick Invoice Upon Due (this is sent to customers on the due date of the invoice).
• Quick Invoice Past Due (this is sent to customers when the invoice is past due).
• Notification to the Merchant when a Quick Invoice is paid (simple email advising the Merchant that the invoice has been paid).
• Notification to the Merchant when the Quick Invoice is re-opened (used with the invoice has been re-opened by the customer).
These templates can be customized by following the steps below:
1. Log in to the Paya Connect Merchant Portal.
2. Navigate to the locations details page from the left-hand menu by clicking on 'Locations'.
3. Click on the 'Settings' tab on the right-hand side of the screen.
4. Select 'More'.
5. Select the Notifications Templates option.
6. Click the edit pencil icon to the right of the template that you would like to edit.
7. Once you have made the edits to the notification, click 'Save'.
a. Please see the appendix for a list of Paya Connect Placeholders for Quick Invoice.
Enabling e-Invoicing in Sage 100 Cloud
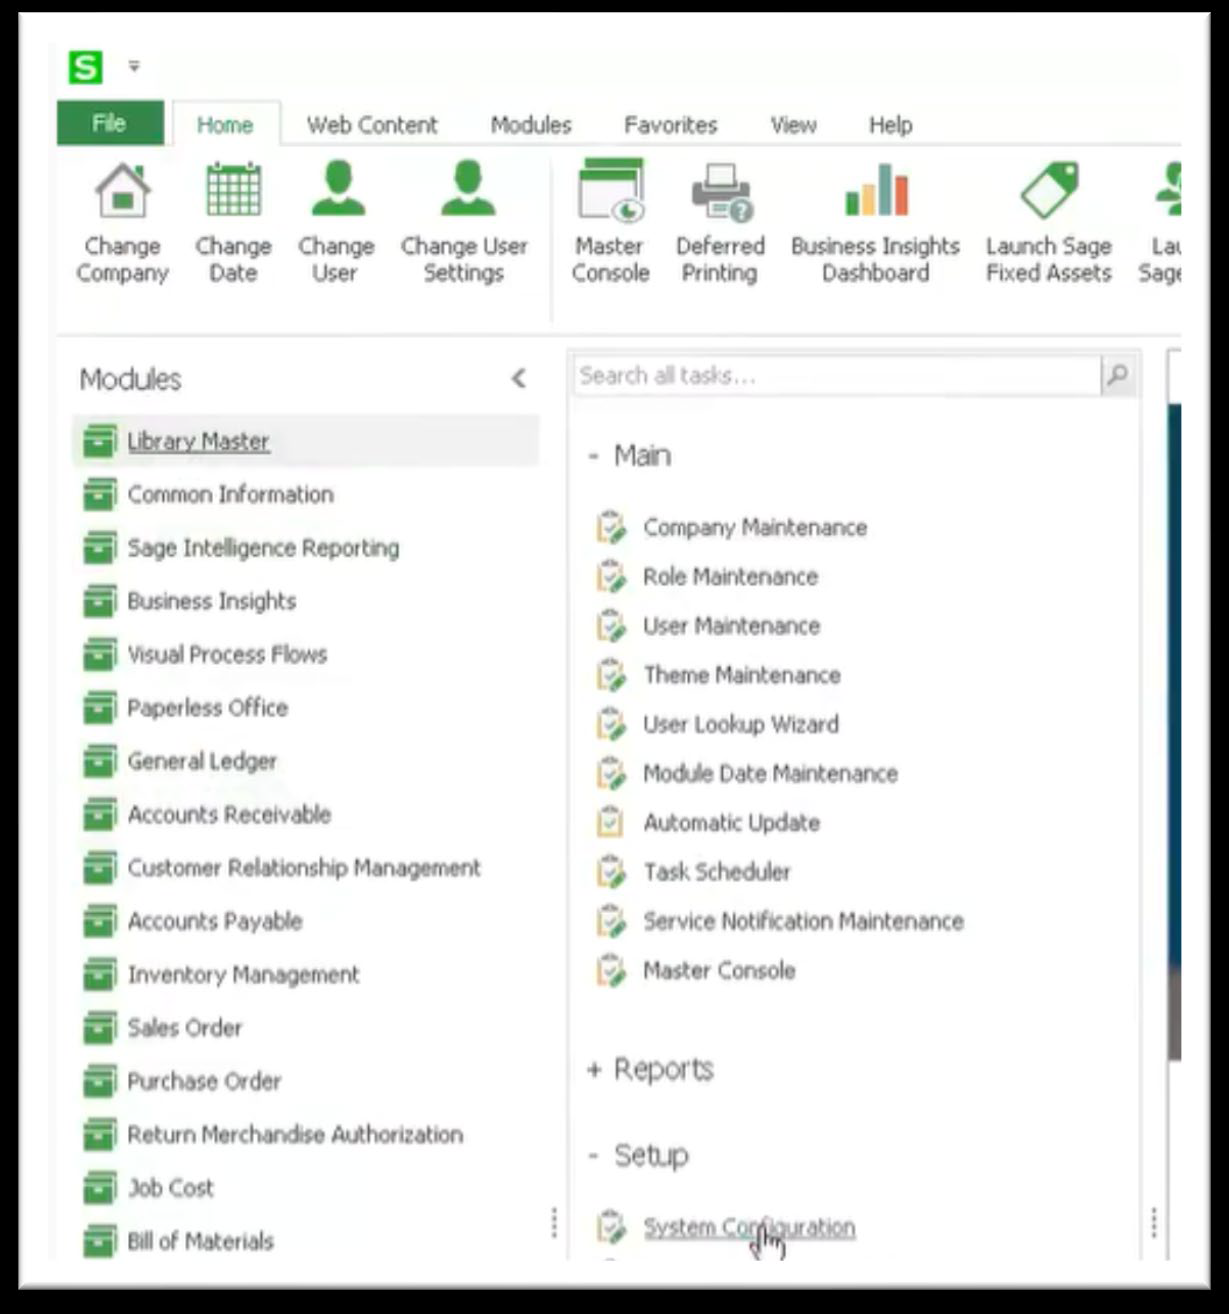
1. Select Library Master Setup Menu > System Configuration.
2. On the Security tab, click the Edit button and enter your User ID and API key provided by Paya’s Customer Enablement Team.
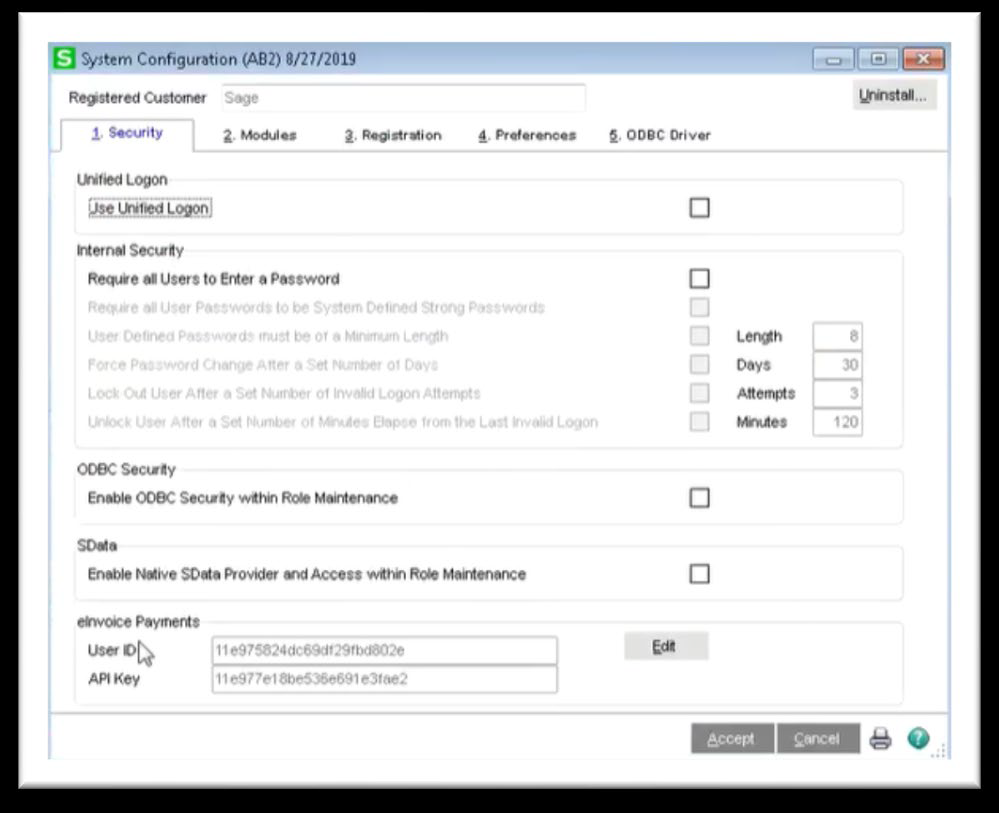
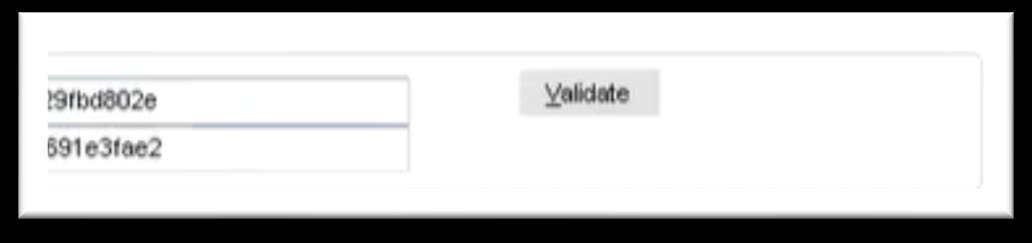
3. Click Validate to verify that the information entered is correct.
4. Select Library Master Main Menu > Company Maintenance.
5. Select a company and click the 'Payment' tab.
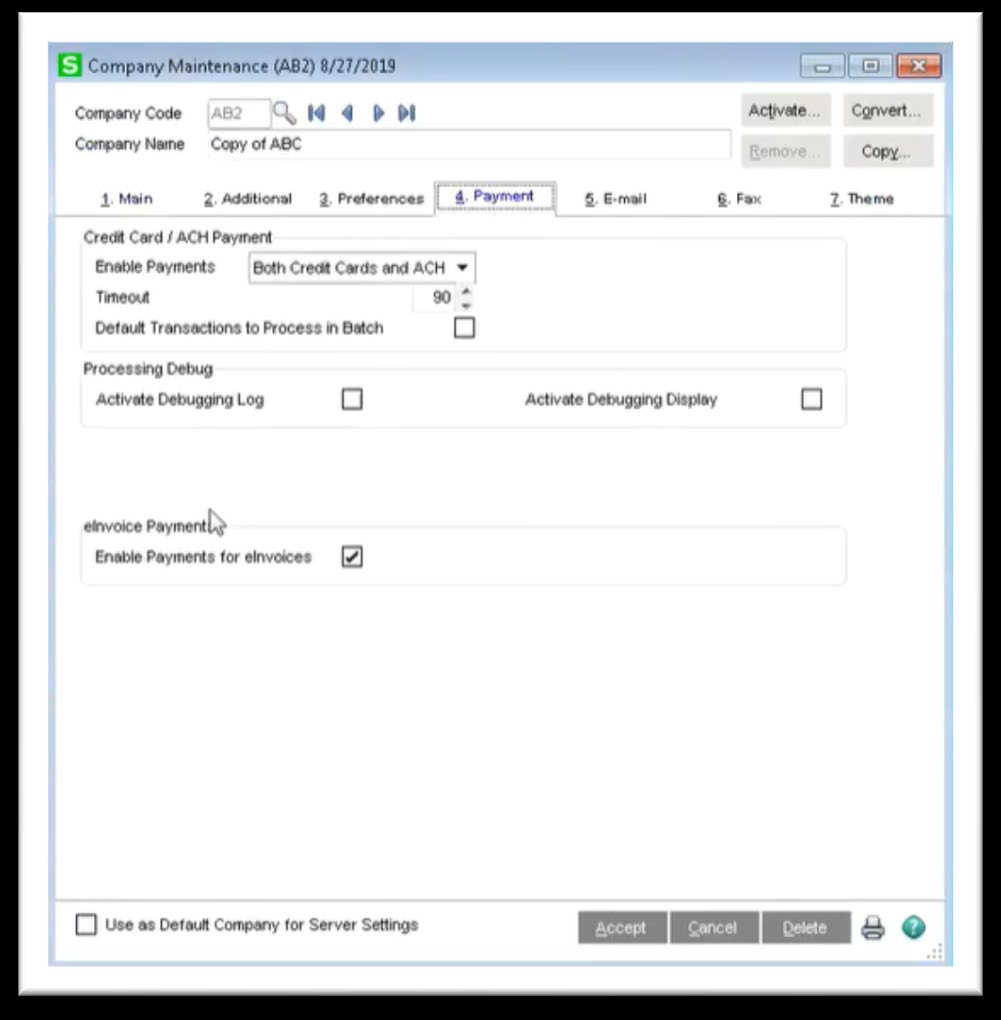
6. Select the 'Enable Payments' for the e-Invoices checkbox and click 'Accept'.

7. Repeat steps 4 and 5 for additional companies as needed.
8. You can now enable e-Invoicing for your customers.
Enabling e-Invoicing for Individual Customers
1. Select Accounts Receivable Main Menu > Customer Maintenance.
2. Select a customer and then click the 'Additional' tab.
3. Select the e-Invoice 'Payments' checkbox, then click 'Accept'. When you process an invoice for this customer, the e-Invoice 'Payments' checkbox is automatically selected in 'Invoice Data Entry'.
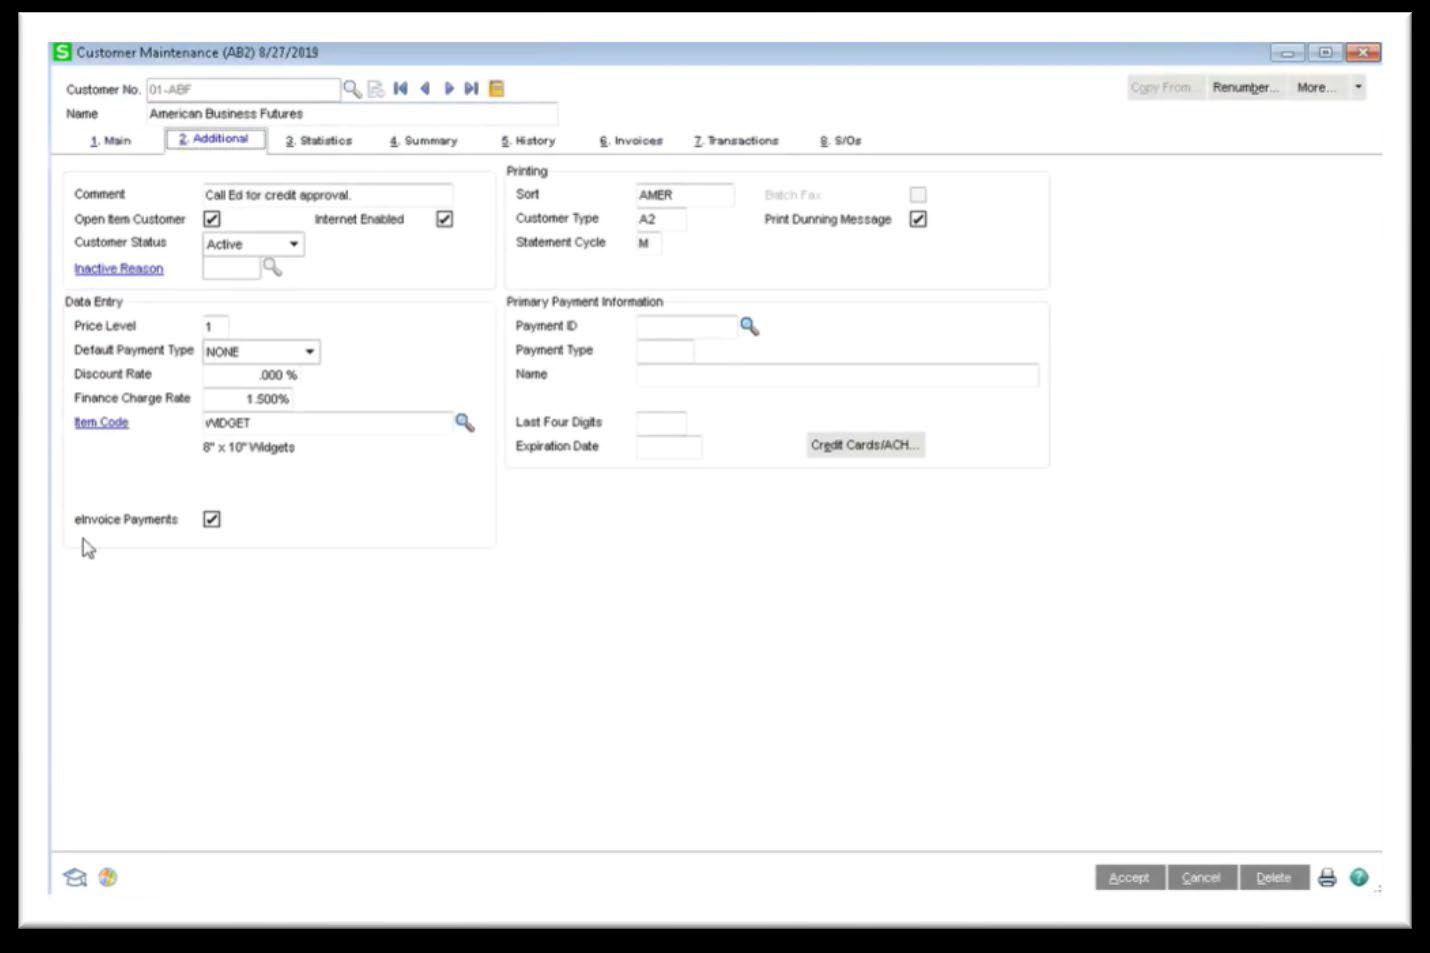
4. The invoice information will be sent to Paya when updating the 'Accounts Receivable Sales Journal', 'Sales Order Sales Journal', and the 'Job Cost Job Billing Register'.
a. If an invoice PDF exists, the PDF will be sent to Paya Connect and included in the payment email to the customer.
Enabling e-Invoicing for a Range of Customers
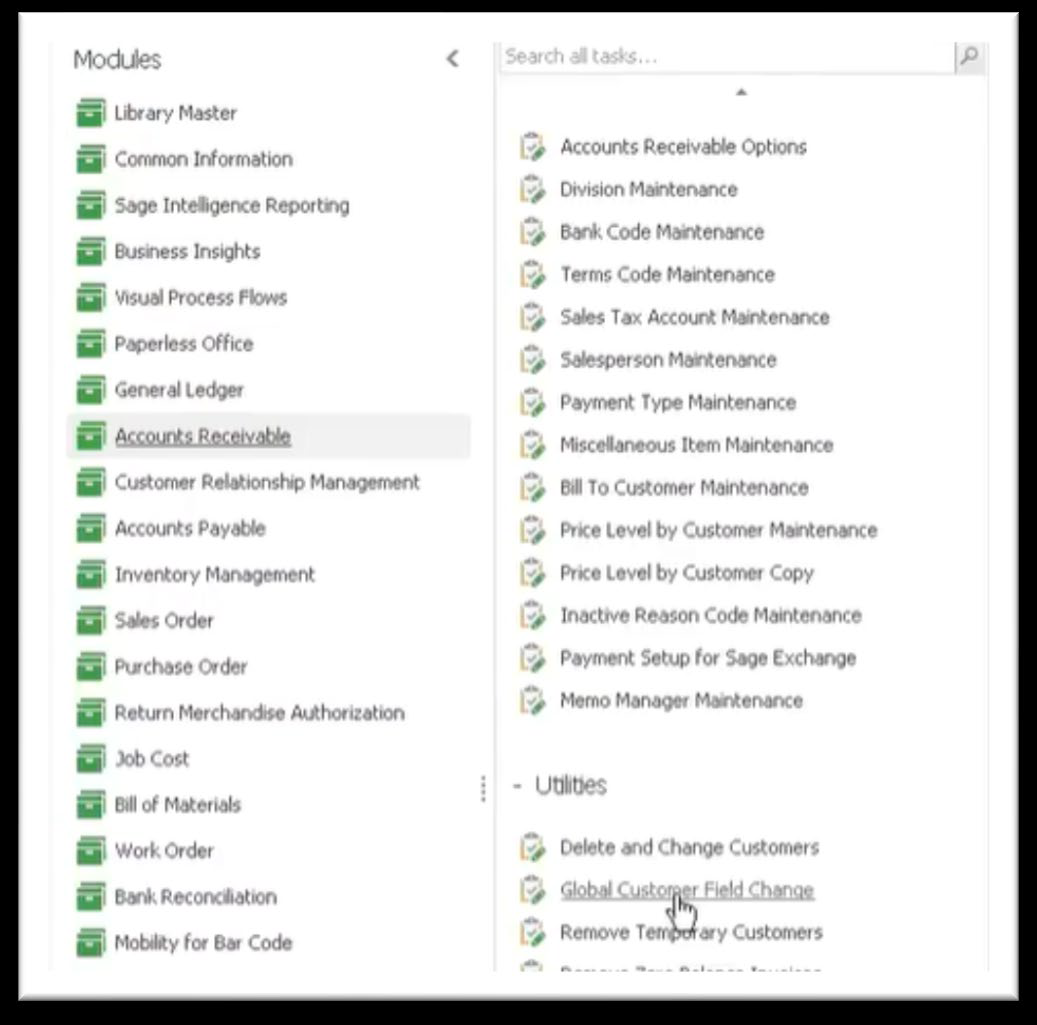
1. Select Accounts Receivable Utility Menu > Global Customer Field Change.
2. On the Main tab, select the e-Invoice Payments row and select 'Yes' in the "Change To" column.
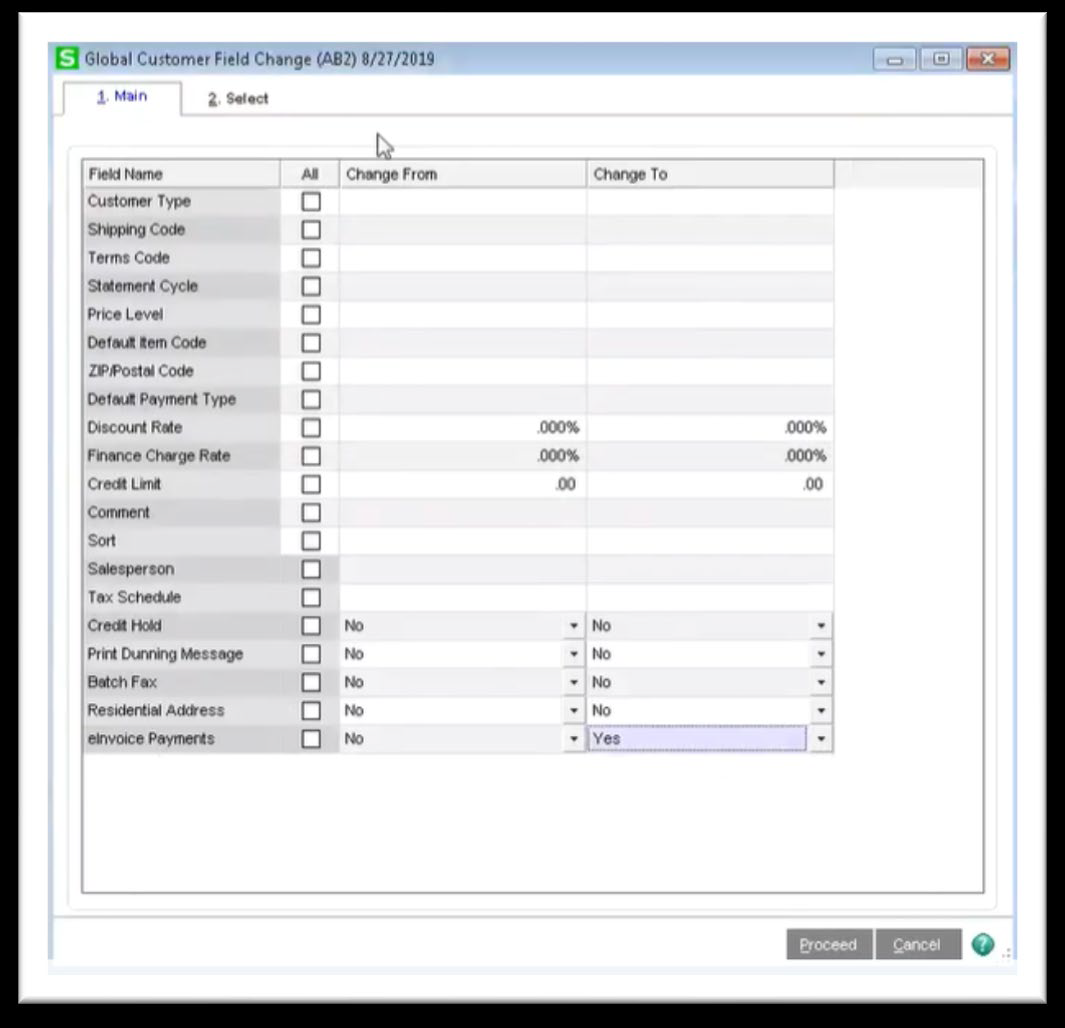
3. On the 'Select' tab, enter your selection criteria.
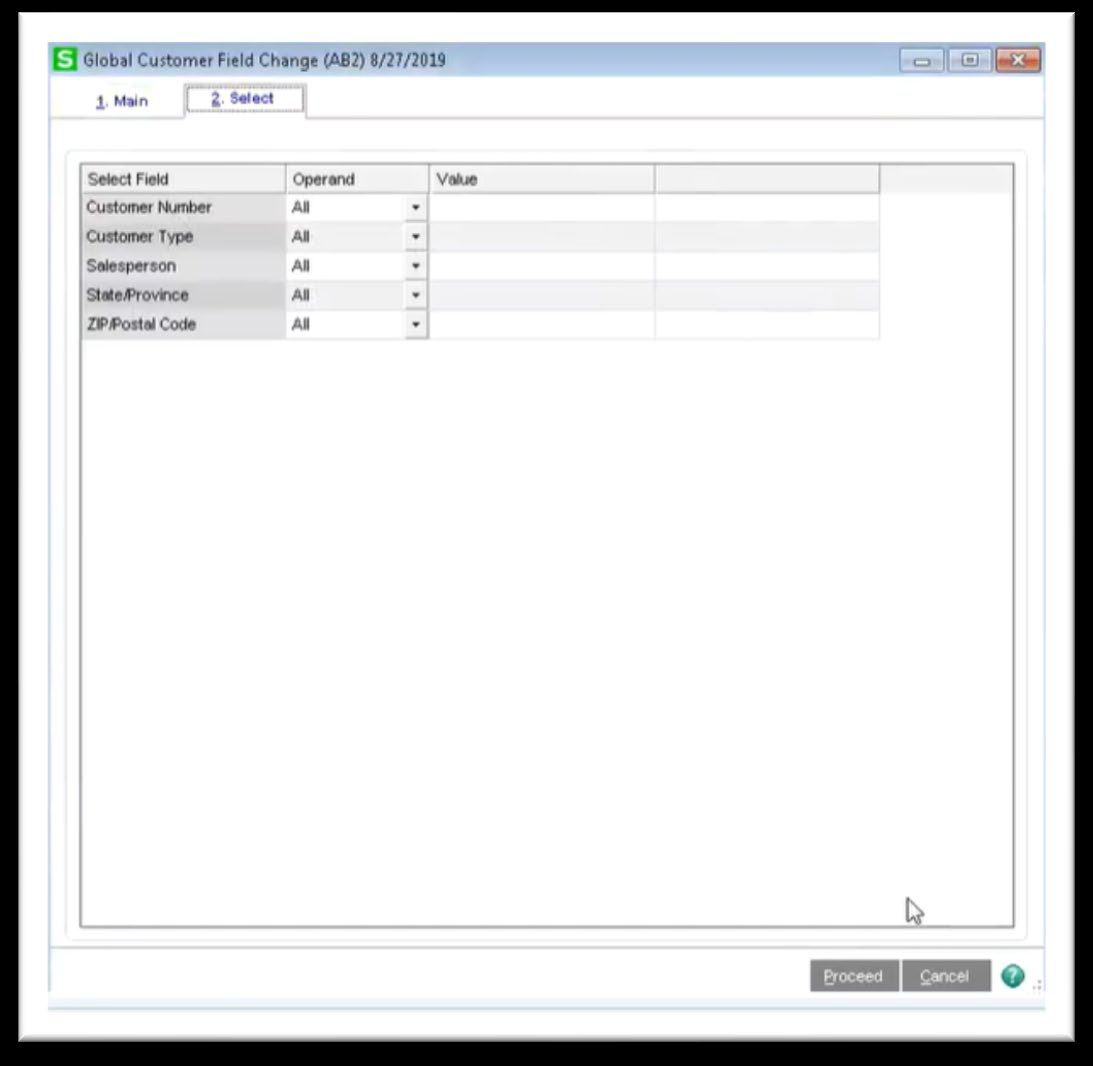
4. Click Proceed. When you process invoices for these customers, the eInvoice Payments checkbox is automatically selected in Invoice Data Entry.
5. The invoice information will be sent to Paya when updating the Accounts Receivable Sales Journal, Sales Order Sales Journal, and the Job Cost Job Billing Register.
a. If an invoice PDF exists, the PDF will be sent to Paya Connect and included in the payment email to the customer.
Importing e-Invoicing Payments into Card Receipts Entry
1. Select Accounts Receivable Main Menu > Cash Receipts Entry.
2. If you have batch entry enabled, in the Cash Receipts Entry Batch window, enter a batch number and then click 'Accept'.
3. In the 'Cash Receipts Deposit' window, enter a deposit number.
4. Click the e-Invoice 'Payments' button.
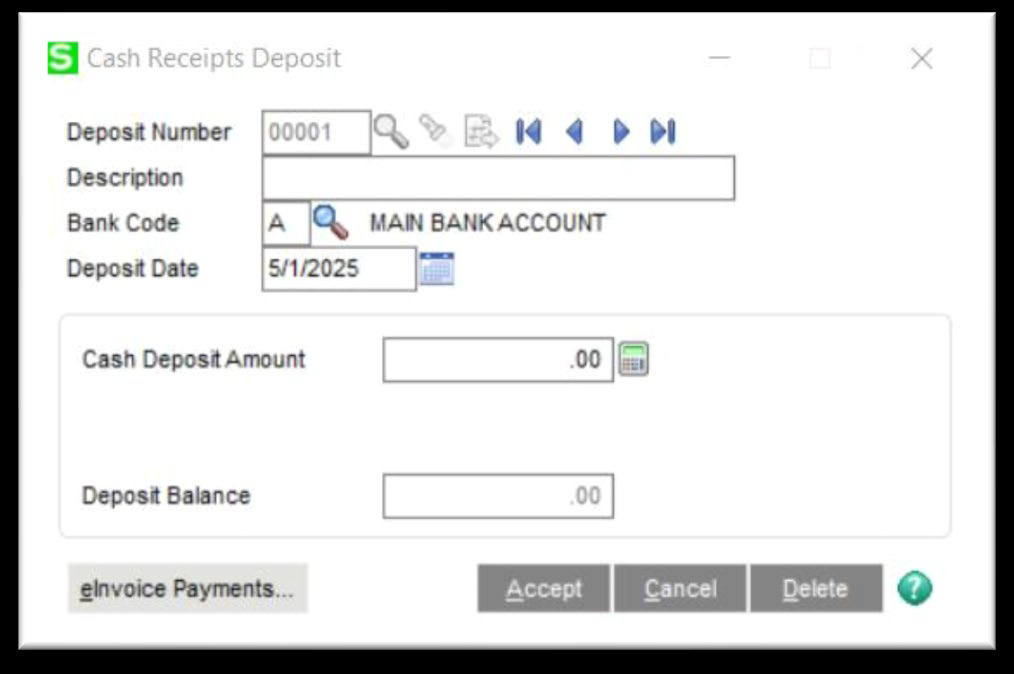
5. In the Import e-Invoice 'Payments' window, enter a date to import payments made on or after that date, and then click 'Proceed'. A message tells you how many payments were imported, and the total payment amount is entered in the 'Cash Deposit Amount' field in the 'Cash Receipt Deposit' window.
6. Click 'Accept' to proceed to Cash Receipts Entry.
7. You can click the 'Cash Receipts List' button to view a list of payments that were imported. For all payments, the deposit type is 'Cash'. For open-item customers, the check number is E00000001. For balance-forward customers, the check numbers start with E00000001 and increment from there.
Note: The 'Payment' tab is not available when importing e-Invoice payments.
8. Click the 'Print' button to print the Cash Receipts Journal.
9. Print and update the journal.
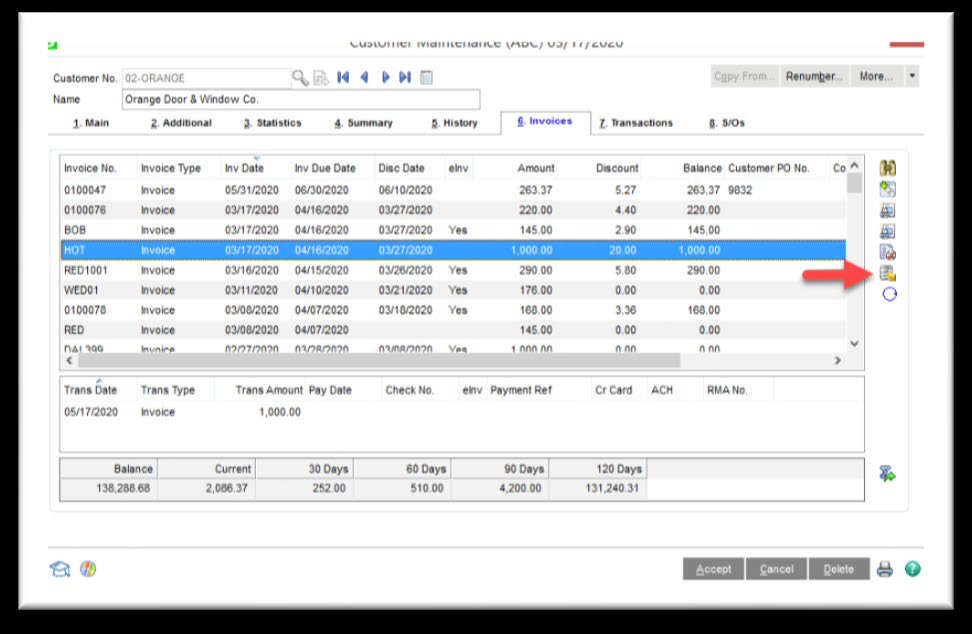
10. The e-Invoice payments have been imported. In Customer Maintenance, the payments appear in the secondary grid on the Invoices tab and on the Transactions tab. 'Yes' appears in the e-Invoice column and the last 4-digits of the credit card/ACH account number will display in the Payment Reference column. For credit card payments, "CC" appears before the last 4-digits and "ACH" will display for ACH payments.
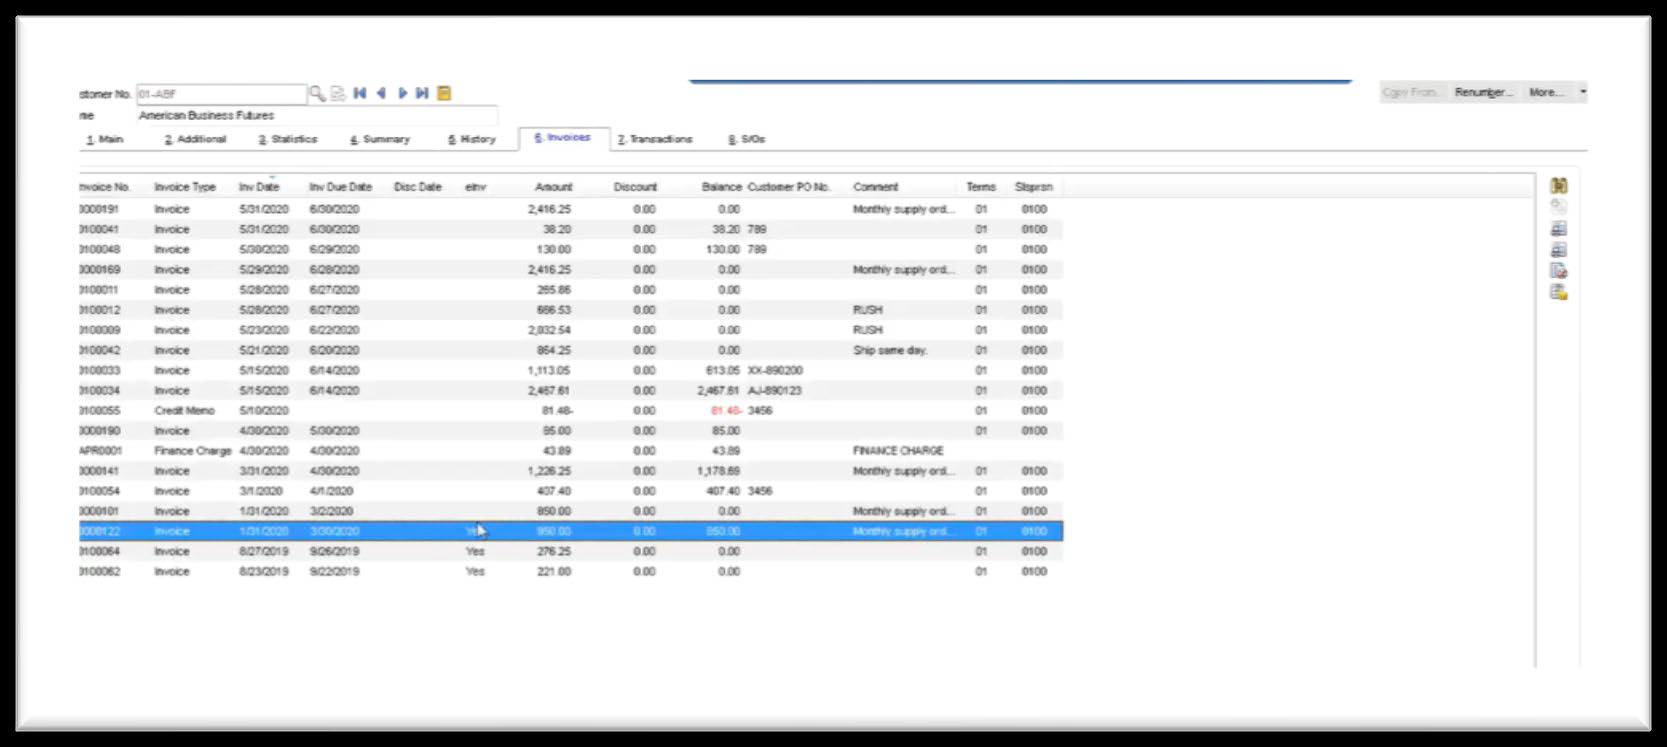
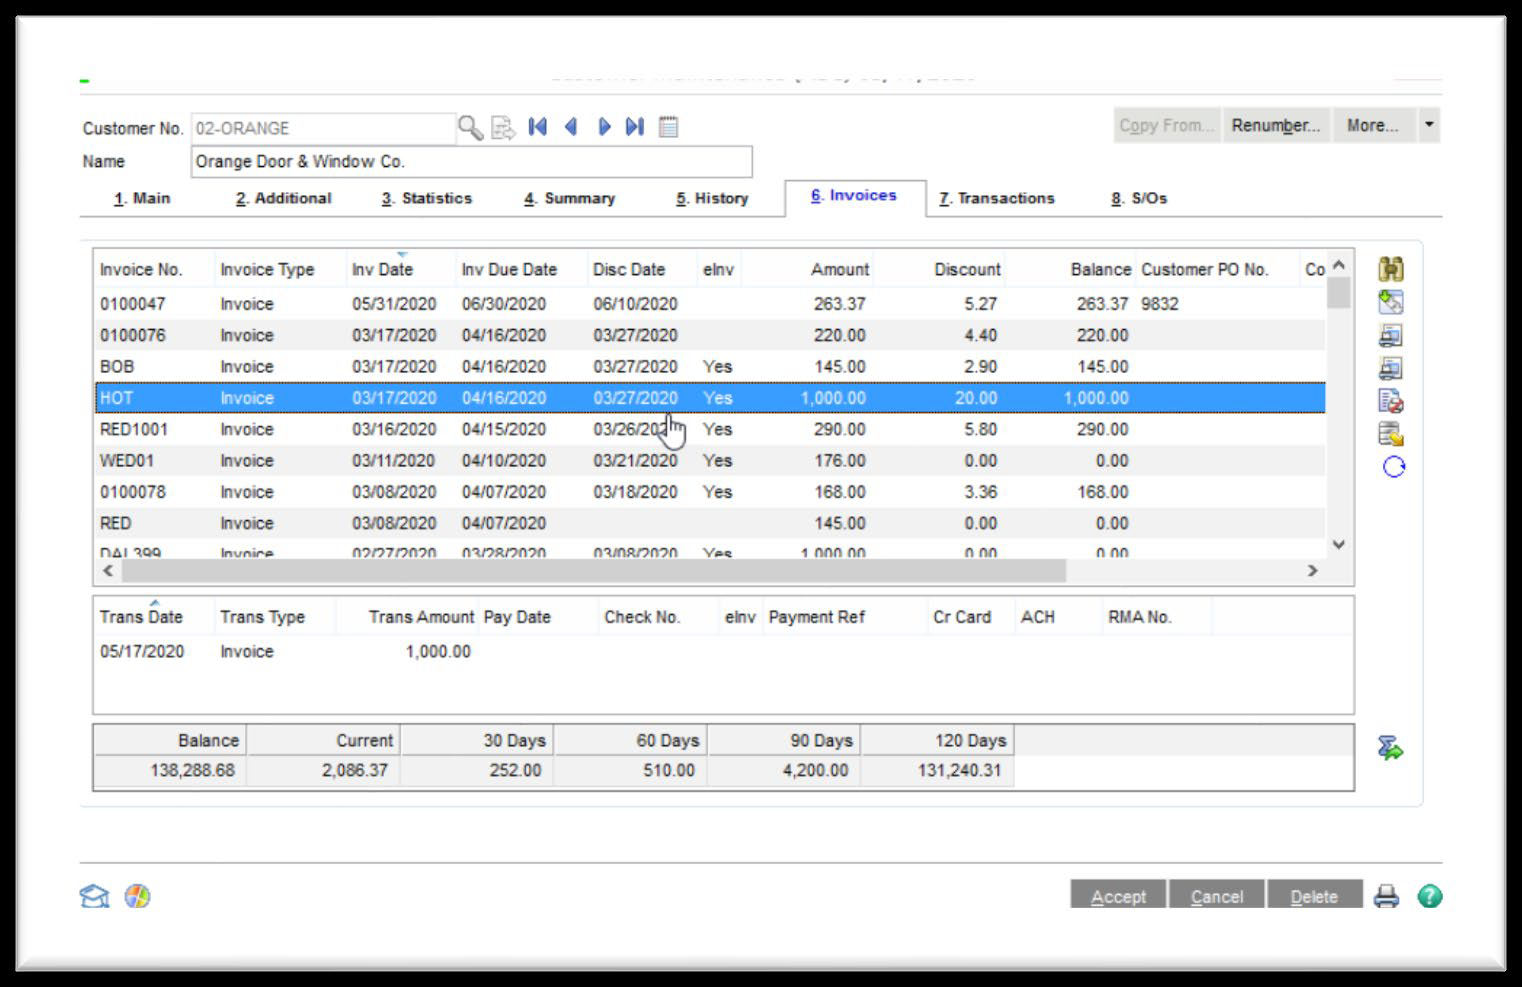
Sending Invoices to Paya from Sage 100 Cloud Customer Maintenance and Invoice History
1. Select Accounts Receivable Menu > Customer Maintenance.
2. Select the 'Customer'.
3. Click on the 'Invoices' tab
4. Select the invoice to be sent to Paya.
5. On the right-hand side of the 'Customer Maintenance' window and click the 'Send e-Invoice' button.
6. Click 'Yes' to send the invoice to Paya.
7. A confirmation message will be displayed; click 'OK'.
8. The invoice tab will update to reflect the invoice as being sent to Paya Connect, with 'Yes' under the 'e-Inv' column.
Appendix: Paya Connect Placeholders for Quick Invoice
Include receipt image: ##product_transaction.receipt_logo##
o Image can be referenced from another server as well
Pay Link: ##paylink##
Information from the Quick Invoice
o Due Date: ##quick_invoice.due_date##
o To Email: ##quick_invoice.email##
o Expire Date: ##quick_invoice.expire_date##
o ID (System Generated): ##quick_invoice.id##
o Invoice #: ##quick_invoice.invoice_number##
o Item Footer: ##quick_invoice.item_footer##
o Item Header: ##quick_invoice.item_header##
o Location ID: ##quick_invoice.location_id##
o Note: ##quick_invoice.note##
o Notification Days After Due Date: ##quick_invoice.notification_days_after_due_date##
o Notification Days Before Due Date: ##quick_invoice.notification_days_before_due_date##
o Notification On Due Date: ##quick_invoice.notification_on_due_date##
o Payment Status ID: ##quick_invoice.payment_status_id##
o Payment Status: ##quick_invoice.payment_status##
o Remaining Balance: ##quick_invoice.remaining_balance##
o Status ID: ##quick_invoice.status_id##
o Invoice Title: ##quick_invoice.title##
Information from the Paya Connect Service
o Receipt Header: ##product_transaction.receipt_header##
o Receipt Footer: ##product_transaction.receipt_footer##
o Receipt Add Account Above Signature: ##product_transaction.receipt_add_account_above_signature##
o Receipt Add Recurring: ##product_transaction.receipt_add_recurring_above_signature##
o Receipt VT Above Signature: ##product_transaction.receipt_vt_above_signature##
Information from the Paya Connect Location
o Address1: ##location.address1##
o Address2: ##location.address2##
o City: ##location.city##
o Email Reply To: ##location.email_reply_to##
o Fax: ##location.fax##
o Name: ##location.name##
o Office Phone: ##location.office_phone##
o Office Extension: ##location.office_ext_phone##
o Receipt Logo: ##location.receipt_logo##
o State: ##location.state##
o Zip: ##location.zip_code##
Information from the Paya Connect Contact
o ID: ##contact.id##
o Account Number: ##contact.account_number##
o Address: ##contact.address##
o Cell Phone: ##contact.cell_phone##
o City: ##contact.city##
o Company Name: ##contact.company_name##
o Balance: ##contact.contact_balance##
o Email: ##contact.email##
o First Name: ##contact.first_name##
o Home Phone: ##contact.home_phone##
o Last Name: ##contact.last_name##
o Office EXt: ##contact.office_ext_phone## o Office Phone: ##contact.office_phone##
o State: ##contact.state##
o Zip: ##contact.zip##
Displaying the Item List from the Quick Invoice
o ##ITEMLIST##
Displaying the File List from the Quick Invoice
o ##FILELIST##
If you have questions or require additional information, please contact us, and we will be in touch with you shortly.
